


 Live Chat
Flourishing business segments vociferously forecasts the potential of leading cloud technology and its applicability in today’s fast-paced economy. Commencing operations on shared hosting platform is incontrovertibly measured as a less-headache, low-cost, and low-priced substitute. However, this alternative comes with a few inadequacies, demanding a more fledged way to answer vigorous business swings.
Prior moving ahead, let’s take a sneak peak at some of the key constraints, which mounts pressure on organizations/individuals to make a fast move:
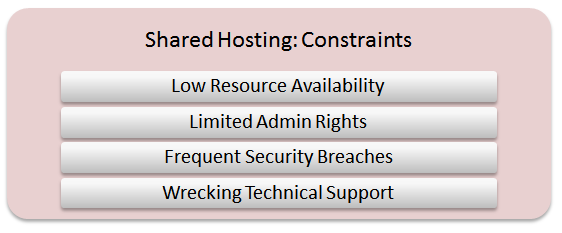
Ostensibly, constrictions of shared web hosting impede business prosperity, leaving organizations behind the competition. In this light, businesses endeavor to opt for a scalable plus competent cloud server hosting solution that can bring success forth. As per a research report, companies at large are leveraging cloud for their critical operations/applications. While making a move, it is vital to build a robust migration strategy that can ascertain requisite computing power, storage, and other resources as your business demands. To be precise, well-formulated migration strategies eliminate downtime risk, reduce capital expenses/ administrative costs, and retain the overall performance.
How Cloud Is an Optimal Answer to All Your Traditional Hosting Woes?
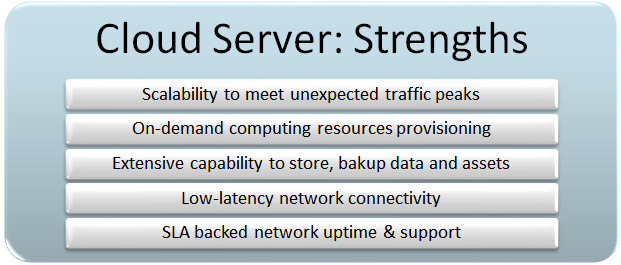
Right from the application developers to architects seeking to create new applications can opt for cloud in order to irrefutably design best-suited components, processes and workflow for their organizations. In addition to this, they can incorporate desired APIs, programming models, operating systems, languages, and databases – which they feel deems fit with their ongoing operations.
An Impeccable Migration Strategy Involves:
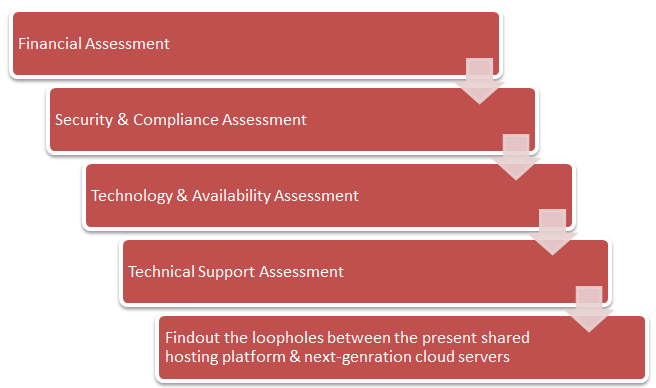 Once you are through with the assessment phase, create a roadmap and plan for your business.
Now, let’s understand about the various steps involved in the migration process:
Step 1
Before You Commence, Create a Backup
Backup plays a pivotal role in making a strong move. It gives an insight of all your work strategies plus ensures peace of mind. Therefore, it is recommended to create a comprehensive backup of all your critical files including MySQL database, images, themes, scripts, static webpages, and plugins.
Go to your cPanel, select Backup Wizard, and then MySQL Databases. Download the MySQL database in *.sql.gz format, thereafter, save it at a safe location on your computer.
Step 2
Use LAMP stack to Setup the Cloud Server
Linux, Apache, MySQL, and PHP (LAMP) stack is a collection of open source software applications that ensures seamless web server operations. In order to install the LAMP stack, checkout: https://help.ubuntu.com/community/ApacheMySQLPHP.
Step 3
Once the setup of LAMP stack gets completed, install the latest version of WordPress on Ubuntu. It can be downloaded by visiting its official website – https://wordpress.org/download/
 Immediately after you hit the download button, installation package gets saved on your hard disk.
- Locate and extract it to a newly created folder.
- Upload the WordPress Files using FTP
- Now, create a MySQL database for WordPress by entering the details
- Navigate your website to initiate the installation process &click on ‘create a configuration file’
- Fill all the necessary details in the created MySQL database &press ‘Submit’
- Thereafter, click on ‘Run to install’.
FTP – File Transfer Protocol (FTP) help webmasters to upload their websites on their hosting accounts. It is considered as the swiftest way for transferring files on the Internet.
Note: If WordPress is uploaded in public_html directory, you need to go to http://yourdomain.com in your desired browser.
Step 4
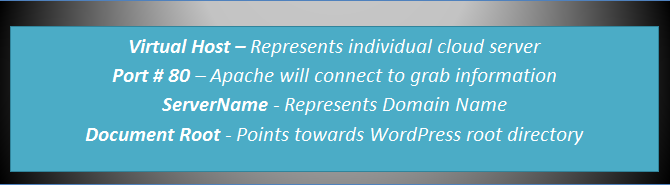
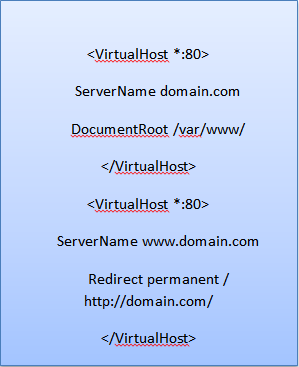
Create a Virtual Host
In this step, you need to create an Apache virtual host to manage your website/blog functionality. Proceed to create a new file in the site-available directory.
sudo nano /etc/apache2/sites-available/domain.com
Add a host for your website/blog. Accordingly, mention your domain name plus username.
Now, you are required to reload the Apache server by executing the following command:
![]()
Note: Whenever you make modifications in server configuration, you are required to reload the apache server in order to implement the applied changes.
Step 5
Restore Database and All Files
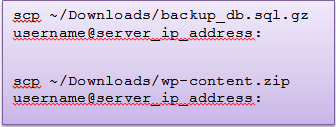
It’s the turn to import all your files including images, themes, and articles. Upload the backup data to VPS using SCP. SCP is quite similar to File Transfer Protocol (FTP), however, it transfers the files securely over SSH.
To upload the backup data, execute the following commands on your PC:
Login to the server and type for restoring your database…thereafter execute the following command by mentioning correct database name and user:

For restoring wp-content files
In order to restore the WordPress content files including images, plugins, videos, scripts – extract the zip archive. To do so, execute the following command:

Step 6
Ensure your website/blog is setup adequately. To ascertain the same, execute the below command:
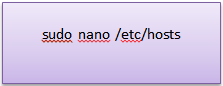
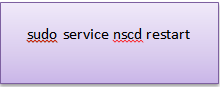
Thereafter, you need to clear DNS cache to implement the made changes. You can try .nscd tool for clearing the DNS cache:
Visit the domain name to check if every step you have taken is executed properly.
Step 7
DNS Settings Updation
This is the final step. You are required to update your DNS settings with the Domain Registrar.
Note: It is recommended not to terminate your shared WordPress hosting account immediately after following the aforementioned steps in order to avoid downtime issues. At least wait for 24 hours for seamless website functionality.
Taiba Fatima is a Delhi, India based content writer with a knack for technical writing. Her alacrity to explore new horizons and learn technological advancements add piquancy to her writing profession. Apart from technology, she is a passionate blogger and loves to write about other verticals including: BPO sector, Travel, Art & Culture.

The above article very useful to move a wordpress shared hosting account to a cloud server with zero downtime. Thanks for sharing.